Have you ever had a hardware failure or lost a storage device and all your important files are gone? It’s not surprising if you have – digital disasters are, unfortunately, common occurrences. When bad things like this happen, you will be quite glad that you have backed up your devices, such as NAS, desktop computers, laptops, or phones to ElephantDrive because, while the physical device is no longer working or no longer available, you can still retrieve and restore your data at the ElephantDrive website. What a lifesaver, right?!
There are two methods to retrieve your files from ElephantDrive – Download and Restore:
– For a small number of files (aka mission essentials) that you need to quickly obtain, use the Download function to get few files/folders right away.
– For the full set of backups that you have synced to ElephantDrive from your devices, use the Restore function and expect it to take some time before your complete data set is recovered (duration varies among size of your data storage). Unlike Download, which is an ad hoc request, Restore is an automated job (similar to your Backup job) that will manage the process over time, even if you need to go offline before the transfer completes.
Download a file/folder:
#1: Log in to your account online: https://vault.elephantdrive.com/account/login.aspx
#2: Navigate to the file or folder that you would like to download
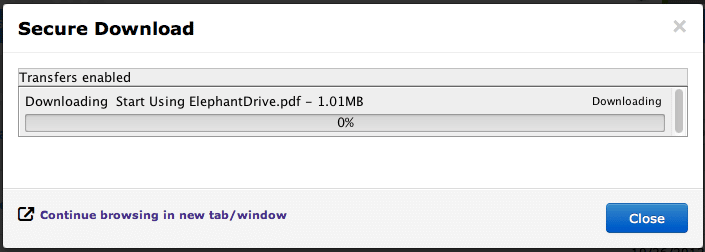
#3: Right-click on the file/folder and select “Download” (or highlight the folder and click on the “Download” button). You must have Java installed on your machine. Check for Java here: http://www.java.com/en/download/installed.jsp

#4: Select the location on your device where you would like to download the file/folder to. The download window will then show the progress of the download. You will need to keep this window open for the Download to finish. You are done once it’s finished the download process!

Restore a folder:
#1: Navigate to the folder that you would like to restore
#2: Right-click on the folder and select “Restore Folder” (or highlight the folder and click on the “Restore” button)

#3: Select a Destination Device and the Destination Path where you would like to restore the folder to. This device must be connected to your account (it can be a NAS device, PC, Windows Server, or Mac) and does not have to be the device where you originally backed up from. This can be set up and initiated offsite as well. Here, you can also enable “Overwrite: to replace any similar named files from the lower left corner.
#4: Click “Start Restore Now” or use the drop-down menu to select a different time to begin the restore.

You will see a confirmation message once the restore is complete.

Don’t you love the easy steps to rescue your data? Make sure you back up your NAS and other devices to ElephantDrive.com!
—
ElephantDrive is proud to partner with these leading NAS manufacturers to ensure the best performance and user experience:

We are pre-installed as the “ReadyNAS Vault” on nearly all ReadyNAS storage products.

ED comes pre-installed on nearly all QNAP TurboNAS products.

ED is pre-installed on all Drobo 5N devices.

ED is pre-installed on the WesternDigital (WD) My Cloud EX4. More to come very soon!

ED is available on nearly all Thecus storage products.

ED will soon be available on nearly all Synology NAS devices. Stay tuned!
Questions? Feedback? Email us at support@ElephantDrive.com, we are always here to help!


